Chocolate Truffle Daifuku Mochis
Made by TCHO Pro Sam Butarbutar
“Growing up, I loved eating these parcels of mochis because they’re so fun to eat; there’s always an element of surprise, and the chewy texture is so satisfying!"
— Sam Butarbutar
Tools
- 1 digital thermometer
- 1 deep pot
- 2 wide metal bowls
- 2 fine sieve strainers
- 1 rubber spatula
- 1 balloon whisk
- 1 microwavable glass bowl
- 1 plastic bowl scraper
- 1 wooden paddle
- 1 measuring cup
- 1 rolling pin
- 1 circular cutter (3.5 inch if possible)
- 1 size 70 scooper
Cooking Time
2 Hours
Makes 20 Servings
Ingredients
Directions
Truffles
- Set up a double boiler. Fill a deep pot with around 1-2 inches of water, place on the stove on low heat, and place a wide metal bowl on top. Make sure the bowl is wide enough to cover the entire pot.
- In the metal bowl, add all of the chocolate, butter, sea salt, and melt. Take caution that the water underneath the bowl doesn’t get too hot (it should just be simmering, not boiling). If it does, add a cup of cold water to bring the temperature down. Continue stirring chocolate mixture with a spatula so everything melts evenly. Check with a thermometer; you want the melted mixture to reach a temperature between 120-130ºF.
- Once the chocolate mixture reaches 120-130ºF, take off the boiler and set it aside. Place a fine sieve strainer over to get it ready for the next step.
- In another clean, wide metal bowl, add the egg yolks and warm water. Whisk to combine.
- Place egg yolk mixture on the double boiler, whisking continuously (but still gently. You just want to temper the eggs, not incorporate air into the mixture). Heat the yolk mixture until it reaches 160ºF and remove from heat.
- Pour the yolk mixture directly over a fine-sieve strainer and into the chocolate mixture.
- Gently tap sieve to pass through all the egg yolk mixture, but do not push anything through the strainer (this will help make sure your truffles stay super smooth and creamy).
- Vigorously whisk the entire mixture with a balloon whisk for about 1 minute. You want the mixture to be shiny and satiny. It should look like a chocolate pudding at the end of whisking.
- Once you reach the correct consistency, refrigerate for an hour while you move on to the next step.
Mochi Skin
- In a microwavable glass bowl, add the mochiko flour, cane sugar, and sea salt. Stir to evenly combine.
- Measure milk in a measuring cup. Then, in 5 parts, add the milk into the dry mixture, and stir with a wooden spoon. Adding the milk in separate parts is crucial to make sure that there are no lumps. At the end, give it one more vigorous stir to get rid of any lumps
- Then, add the vanilla and syrup. Stir once more to combine.
- Cover the entire bowl with a microwave-safe plastic film. Microwave on high for 5 minutes.
- Once ready take it out of the microwave. Be careful, the mochi and bowl will be very hot. With the wooden paddle, vigorously mix the mochi so it becomes elastic and stretchy. Depending on the strength of your microwave, you might see a small liquidy puddle of uncooked mochi. If you see this, cover the bowl with plastic again and microwave for 1 minute. And then stir again. The skin should be shiny and almost translucent. Cover and set aside.
- Place potato starch in a fine sieve, and generously dust a clean work surface with the potato starch. Then, with a plastic scraper, scrape the hot mochi onto the dusted surface. Dust the top of the mochi with more potato starch
- Dust your rolling pin with potato starch, and gently roll the mochi skin to an even ⅛ inch thickness. Gently check that no mochi is stuck to the table. Use additional potato starch if needed.
- Using a circular cutter (ideally around 3.5 inches in diameter), cut out circles from the mochi. Dust them with more starch, stack, and set aside.
Assembly
- Check to see if your chocolate truffles are ready for scooping. The chocolate mixture should be the consistency of a firm cookie dough, not be so liquidy that it wouldn't hold its shape and not so firm that you can't scoop it. If it’s too liquidy, refrigerate for 10 more minutes. And if it’s too firm, just leave it out at room temperature to soften.
- With a size 70 scooper, scoop truffles out and set aside on a tray. Dip the flatter side into the cacao nibs. Set aside
- Take one piece of the cut-out mochi skin and set it on a surface. Using a dry pastry brush, gently dust off any remaining potato starch on the mochi skin.
- Place a truffle in the middle of the mochi skin with the flatter side facing down. Then, take two opposite edges of the skin and pinch it together closing at the top of the truffle. Then take the other two remaining edges and pinch together at the top as well. You should have 4 “ears” hanging out now. Take the edge corner of those ears and pinch together in the middle again. Repeat for the remaining corner pair. It should now look like an 8-pointed parcel all meeting on top center of the truffle.
- Enjoy the finished daifukus immediately! If enjoying them at a later time, make sure to refrigerate the daifuku in an airtight container. And take them out 15 minutes before consuming to soften the texture.
- TCHO Pro Tip: The syrup ingredient is completely optional, but it makes the chewiness of the mochi skin a bit softer and more supple. The rice syrup and corn syrup (which is not the same as high fructose corn syrup) are readily available at Asian supermarkets, and the glucose syrup is easily available on Amazon.
*TCHO 62% Mosaic Dark Chocolate is only available for wholesale customers. Suggested chocolate substitution for this recipe: TCHO Choco Charms 60.5% or TCHO Choco Combo 68%
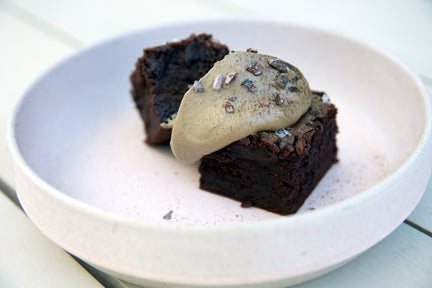
Mochi Brownies with Roasted Matcha Whipped Cream
- Easy
- 45 Minutes
Rich, chewy brownies with toasty matcha infused whipped cream and sprinkled with roasted cacao nibs.
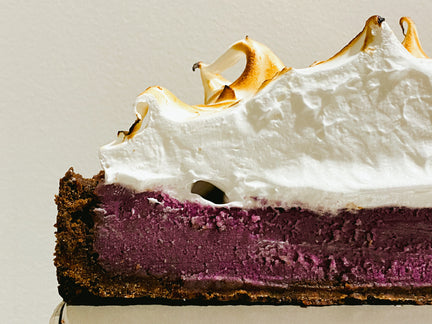
Ube Sweet Potato Pie with Chocolate Crust
- Advanced
- 3 Hours
A fall staple welcome on any dinner table, this pie is creamy, tangy, and not too sweet.
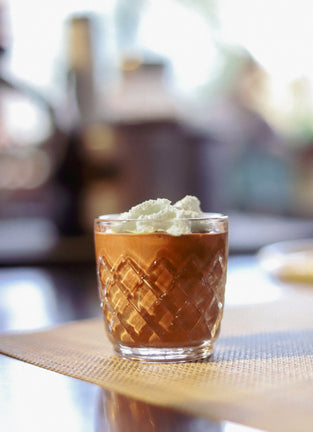
Blue Corn Hot Cocoa Recipe
- Advanced
- 2.5 Hours
Cozy up to this fresh take on hot cocoa, infused with blue cornmeal for its nostalgic notes of buttery cornbread...